ubuntu recovery

開機時按shift進入recovery模式
選’Advanced options for Ubuntu and press’
指定想要使用的kernel image
選擇’drop to root shell prompt’

開機卡在Display Manager

sudo apt-get remove —purge nvidia-*
sudo apt-get install xdm
sudo dpkg-reconfigure lightdm
sudo apt-get purge gdm3
sudo apt-get install gdm3 ubuntu-desktop
sudo reboot

diskspace耗盡

du -sh /var/cache/apt/archives
sudo apt-get clean
sudo apt-get autoremove —purge

du -sk * |sort -nr |head -10
du -sh /var/tmp
sudo apt-get clean
sudo apt-get autoremove
sudo apt-get autoclean

basic mysql configuration on ubuntu16.04

ubuntu16.04 default mysql

1
2
vi /etc/mysql/mysql.conf.d/mysqld.cnf
systemctl restart mysql

准許外部連線

1
#bind-address=127.0.0.1 #註解掉,許可外部連線。等同0.0.0.0

grant priviledges

1
2
3
4
5
6
7
8
9
10
select host,user from mysql.user;
GRANT ALL PRIVILEGES ON *.* TO 'leon'@'10.0.0.%' IDENTIFIED BY 'asdfasdf;lkj' WITH GRANT OPTION;
GRANT ALL PRIVILEGES ON *.* TO 'leon'@'192.168.1.%' IDENTIFIED BY 'asdfasdf;lkj' WITH GRANT OPTION;
GRANT ALL PRIVILEGES ON *.* TO 'leon'@'localhost' IDENTIFIED BY 'asdfasdf;lkj' WITH GRANT OPTION;
GRANT ALL PRIVILEGES ON *.* TO 'leon'@'leon-%' IDENTIFIED BY 'asdfasdf;lkj' WITH GRANT OPTION;
delete from mysql.user where host='::1';
delete from mysql.user where host='%';
commit; flush table mysql.user;
FLUSH PRIVILEGES;
select host,user from mysql.user;

import sql

1
mysql -uleon -paaaaaaaa target_database_name < db_dump.sql

dump sql

1
2
mysqldump --verbose -uleon -paaaaaaaa target_database_name > db_dump.sql
mysqldump --verbose -uleon -paaaaaaaa target_database_name specific_table > table_dump.sql

execute single sql

1
mysql --verbose -uleon -paaaaaaaa target_database_name -e "drop table if exists db1.table1; "

connect remote mysql server

1
mysql -uleon -paaaaaaaa -h 10.0.0.1

取消mysql大小寫敏感

1
2
[mysqld]
lower_case_table_names = 1

utf8 -> utf8mb4

show variables like ‘character%’;

1
2
3
4
5
6
7
8
9
10
11
[client]
default-character-set = utf8mb4

[mysql]
default-character-set = utf8mb4

[mysqld]
character-set-client-handshake = FALSE
character-set-server = utf8mb4
collation-server = utf8mb4_unicode_ci
init_connect='SET NAMES utf8mb4'

docker installation (updated)

Past

1
curl -sSL https://get.docker.com/ | sudo sh

還是可以用,但官方文件沒有推薦這種做法。

Present https://docs.docker.com/engine/installation/linux/docker-ce/ubuntu/

1
2
3
4
5
6
7
8
9
10
11
12
13
14
15
16
17
sudo apt-get -y remove docker docker-engine docker.io docker-ce
sudo apt-get update
sudo apt -y install apt-transport-https ca-certificates curl software-properties-common
curl -fsSL https://download.docker.com/linux/ubuntu/gpg | sudo apt-key add -
sudo apt-key fingerprint 0EBFCD88 \#9dc8 5822 9fc7 dd38 854a e2d8 8d81 803c 0ebf CD88
sudo add-apt-repository \
"deb [arch=amd64] https://download.docker.com/linux/ubuntu \
$(lsb_release -cs) \
stable"

sudo apt-get update 1> /dev/null
sudo apt -y install install docker-ce

apt-cache madison docker-ce
sudo systemctl docker status
docker run hello-world
docker version
docker info

stable/edge/test

依release的穩定度可以有三種選擇。

Uninstall

1
2
sudo apt-get purge docker-ce
sudo rm -rf /var/lib/docker

EE https://docs.docker.com/engine/installation/linux/docker-ee/ubuntu/

建立 Docker 用戶組

默認情況下,docker 命令會使用 Unix socket 與 Docker 引擎通訊。而只有 root 用戶和 docker 組的用戶才可以訪問 Docker 引擎的 Unix socket。因此,將需要使用 docker 的用戶加入 docker 用戶組。

建立 docker 用戶組:

1
sudo groupadd docker

將當前用戶加入 docker 組:

1
sudo usermod -aG docker $USER

測試

1
docker run hello_world

Docker Compose https://docs.docker.com/compose/install/

1
2
3
curl -L https://github.com/docker/compose/releases/download/$dockerComposeVersion/docker-compose-`uname -s`-`uname -m` > /usr/local/bin/docker-compose
sudo chmod +x /usr/local/bin/docker-compose
docker-compose --version

alternative

1
2
3
curl -L --fail https://github.com/docker/compose/releases/download/1.14.0/run.sh > /usr/local/bin/docker-compose
sudo chmod +x /usr/local/bin/docker-compose
docker-compose version

Uninstall Docker Compose

1
2
sudo rm /usr/local/bin/docker-compose
\#sudo rm $(which docker-compose)

Docker Machine https://docs.docker.com/machine/install-machine/

1
2
3
curl -L https://github.com/docker/machine/releases/download/v0.12.1/docker-machine-`uname -s`-`uname -m` >/usr/local/bin/docker-machine
sudo chmod +x /usr/local/bin/docker-machine
docker-machine version

Uninstall Docker Machine

1
2
docker-machine rm -f $(docker-machine ls -q)
sudo rm $(which docker-machine)

gist backup

github官方並沒有提供gist的備份方式,不過提供了功能充份的API,目前已經到了v3。
https://developer.github.com/v3/guides/getting-started/
https://developer.github.com/v3/auth/

backup public gists

這裡使用v1版的API即可,v1當時也沒有功能能備份private gists。
但也就是說你只要知道github帳號就可以備份任意人的public gists。

1
2
3
4
5
6
7
8
9
10
11
12
13
14
15
16
17
18
19
20
21
22
23
24
25
26
27
28
29
30
31
32
33
34
35
36
37
38
39
40
41
42
43
44
45
#!/usr/bin/env python
# @see https://stackoverflow.com/questions/6724490/pull-all-gists-from-github
# Clone or update all a user's gists
# curl -ks https://gist.githubusercontent.com/fedir/5466075/raw/gist-backup.py | USER=fedir python
# USER=fedir python gist-backup.py

import json
import urllib
from subprocess import call
from urllib import urlopen
import os
import math
USER = os.environ['USER']

perpage=30.0
userurl = urlopen('https://api.github.com/users/' + USER)
public_gists = json.load(userurl)
gistcount = public_gists['public_gists']
print "Found gists : " + str(gistcount)
pages = int(math.ceil(float(gistcount)/perpage))
print "Found pages : " + str(pages)

f=open('./contents.txt', 'w+')

for page in range(pages):
pageNumber = str(page + 1)
print "Processing page number " + pageNumber
pageUrl = 'https://api.github.com/users/' + USER + '/gists?page=' + pageNumber + '&per_page=' + str(int(perpage))
u = urlopen (pageUrl)
gists = json.load(u)
startd = os.getcwd()
for gist in gists:
gistd = gist['id']
gistUrl = 'git://gist.github.com/' + gistd + '.git'
if os.path.isdir(gistd):
os.chdir(gistd)
call(['git', 'pull', gistUrl])
os.chdir(startd)
else:
call(['git', 'clone', gistUrl])
if gist['description'] == None:
description = ''
else:
description = gist['description'].encode('utf8').replace("\r",' ').replace("\n",' ')
print >> f, gist['id'], gistUrl, description

backup private and public gists

在備份個人gist資料時,當然是希望pirvate和public都可以一起備份。這個就比較複雜點,必需要使用v3的API走過OAuth來取得授權TOKEN。

https://github.com/aprescott/gist-backup/blob/master/gist-backup

1
2
3
4
5
6
7
8
9
10
11
12
13
14
15
16
17
18
19
20
21
22
23
24
25
26
27
28
29
30
31
32
33
34
35
36
37
38
39
40
41
42
43
44
45
46
47
48
49
50
51
52
53
54
55
56
57
58
59
60
61
62
63
64
65
66
67
68
69
70
71
72
73
74
75
76
77
78
79
80
81
82
83
84
85
86
87
88
89
90
91
92
93
94
95
96
97
98
99
100
101
102
103
104
105
106
107
108
109
110
111
112
113
114
115
116
117
118
119
120
121
122
123
124
125
126
127
128
129
130
131
132
133
134
#!/usr/bin/env bash
#
# gist-backup
#
# Backs up all your public and private gists
# to the given directory.
#
# Example:
#
# gist-backup ~/gist-backups
#
# In addition to your own gists you can also backup your starred gists
# or (public) gists of a defined user by putting the gists url in an
# environment variable.
#
# Example:
#
# GIST_URL=https://api.github.com/gists/starred gist-backup ~/gist-backups/starred
# GIST_URL=https://api.github.com/users/aprescott/gists gist-backup ~/gist-backups/aprescott
#

token=$(git config --get github.gist.oauth.token)
url=${GIST_URL:-https://api.github.com/gists}

usage() {
cat <<END_USAGE

Usage:

gist-backup DIRECTORY

Example:

gist-backup ~/gist-backups

END_USAGE

if [ -z $token ]
then

cat <<END_USAGE_NOTE
NOTE:

In order for this to work, you're going to need
an OAuth token set in your git config under

github.gist.oauth.token

This is because the API token for your account
cannot be used as authentication/authorization
in version 3 of GitHub's API.


END_USAGE_NOTE
fi
}

if [ -z $token ]
then
echo "No OAuth token found in github.gist.oauth.token git config."
exit 1
fi

# if no backup directory has been given
if [ -z "$1" ]
then
echo "No backup directory given."
usage
exit 1
fi

# if the given directory doesn't exist, create it
if [ ! -e "$1" ]
then
mkdir -p $1
fi

# go into the given backup directory
cd $1

# if we failed to cd for some reason, abort
if [ $? -gt 0 ]
then
exit 1
fi

# Take's a git remote URI and clones it into
# the backup directory. If that directory
# exists already, cd's into it and does a
# git pull.
backup() {
echo "Backing up $1"
local dir=$(echo "$1" | cut -d / -f 4 | cut -d . -f 1)

if [ -e $dir ]
then
echo " Already cloned at $PWD/$dir. Pulling."
cd $dir
git pull -q
cd $OLDPWD
else
git clone -q $1
fi
}

page=1
retries=0
MAX_RETRIES=5
while [ $retries -lt $MAX_RETRIES ]
do
echo "Requesting Gist page: $page from $url"

gists=$(
curl -s -H "Authorization: token $token" -d "page=$page" -G $url |
sed -n 's/.*git_pull_url": "\(.*\)",/\1/p'
)

if [ -z "$gists" ]
then
echo "No gists found on this page. Trying again."
retries=$(( retries + 1 ))
continue
fi

for gist in $gists
do
backup $gist
done

page=$(( page + 1 ))
retries=0
done

echo "No gists found (anymore). Not trying again."
exit 0

script部份使用aprescott寫的gist-backup,但在之前要先得到Token塞到git設定裡。

1
2
3
4
5
$ curl -u github-user-name:github-password \
-H "Content-Type: application/json" \
-X POST \
-d '{"scopes":["gist"], "note": "gist backup"}' \
https://api.github.com/authorizations

OTP

如果你的github帳號有設定較安全的2FA,這時光靠username和password是不夠的,github會要你再提供2FA的OTP。

1
2
3
4
{
"message": "Must specify two-factor authentication OTP code.",
"documentation_url": "https://developer.github.com/v3/auth#working-with-two-factor-authentication"
}

就照文件說明在header裡多塞一個X-GitHub-OTP

1
2
3
4
5
6
$ curl -u github-user-name:github-password \
-H "Content-Type: application/json" \
-H "X-GitHub-OTP:012345" \
-X POST \
-d '{"scopes":["gist"], "note": "gist backup"}' \
https://api.github.com/authorizations

一切正常,則返回的一串json裡會有個叫token的欄位,把該欄位的資料複製下

1
$ git config --global github.gist.oauth.token TOKEN

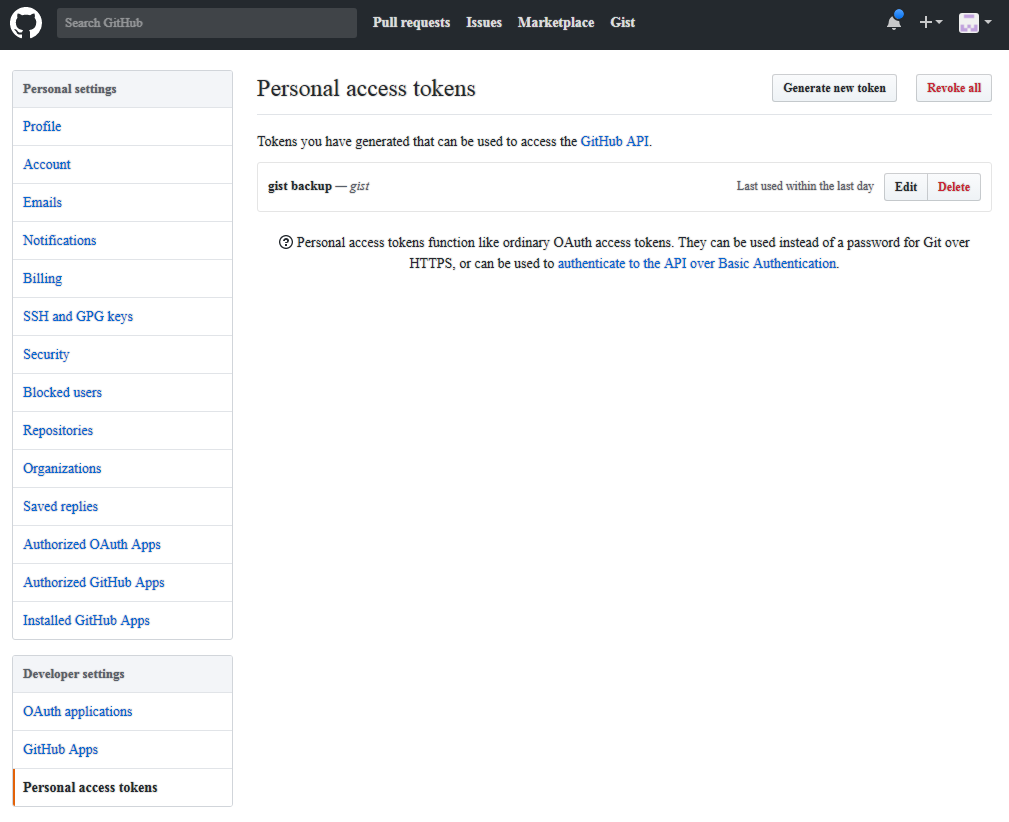
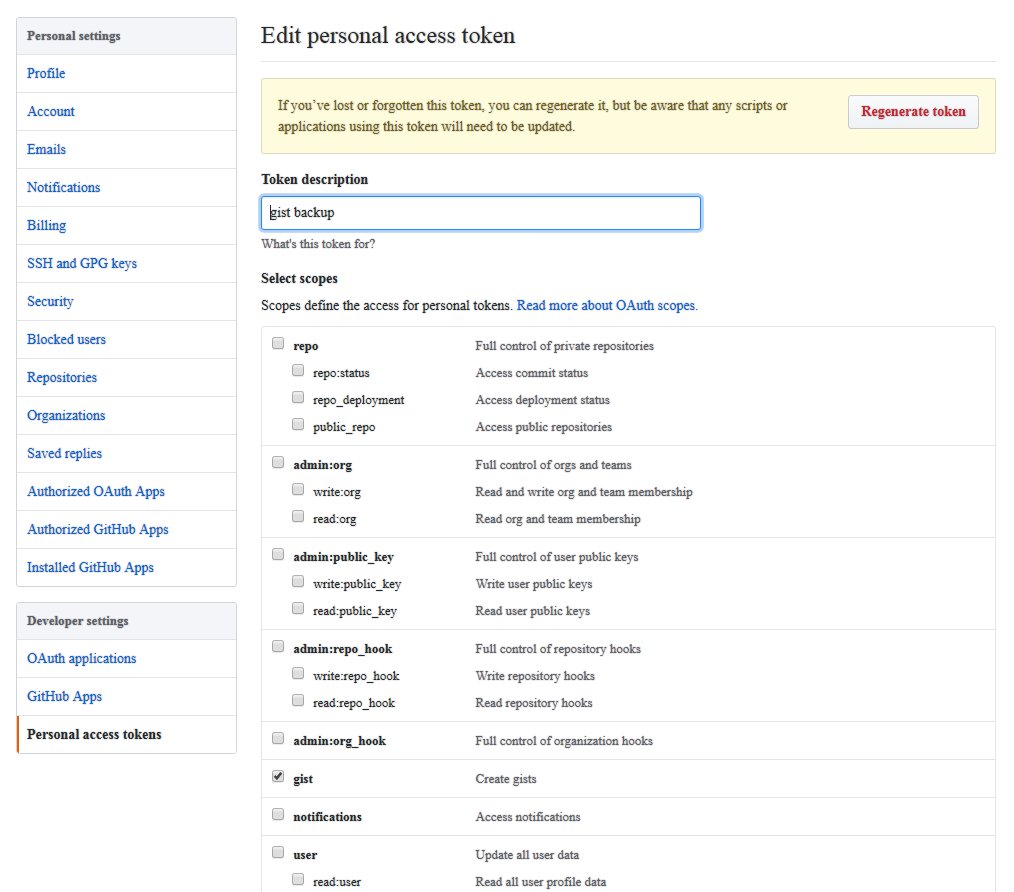
進到 https://github.com/settings/tokens/ 也可以看到有產生一個授權存取gist資料的personal access token。

全部準備完了,就可以直接跑gist-backup sciript把全部資料都爬下來。

1
2
3
4
wget https://raw.githubusercontent.com/aprescott/gist-backup/master/gist-backup
chmod 755 gist-backup
mkdir gist-backup-folder
./gist-backup ./gist-backup-folder

thunderbird experiences

從microsoft office 2003轉移到thunderbird

試了很多轉檔工具,不是卡授權就是卡轉檔數量。MailStoreHome是最後找到無限制又運作良好的工具。

MailStoreHome

  1. 存檔電子郵件 指定outlook2003內的pst檔
  2. 導出EML格式文件到指定目錄
  3. thunderbird安裝importexporttools add-ons
  4. thunderbird內開一目錄後,右鍵使用ImportExportTools>import all messages from a directory 指定匯入EML格式文件目錄

PST、EML或mBox

PST是office使用的文件格式,幾乎thunderbird在匯入office時都會有各種問題而失敗。只好使用第三方工具進行轉檔。
thunderbird使用mBox格式儲放email,但可以裝add-on ImportExportTools來整批匯入EML/mBox格式。
EML格式是每個email都為獨立檔案;用檔案目錄來整理歸類。mBox是單一檔案裡放許多email。
http://www.pcvita.com/faqs/import-eml-into-thunderbird

thunderbird的email account setting

輸入gmail或yahoo的帳號時會自動填pop/smtp server name/port,很方便。
gmail security較嚴格的帳號要從google account裡申請新的”應用程式密碼” : 我的帳戶>登入與安全性>應用程式密碼

Add-ons

ImportExportTools
Manually sort folders

hotkeys

shift-f5 get all messages
ctrl-n write new message
ctrl-shift-f search messages

dayi 大易輸入法 in ubuntu 16.04 ibus

ibus-table-createdb -s dayi3_ibus.txt -n dayi3.db
ibus-table-createdb -s dayi4-ibus1.cin -n dayi4.db
cp dayi*.db /usr/share/ibus-table/tables/
ibus restart
ibus-setup

Setting>LanguageSupport下指定Keyboard input method system: IBus
Setting>TextEntry下加入新的input source: Chinese (Dayi4) (IBus)

※選字要用ctrl+數字鍵,再補上空白鍵完成選字。比較不順手。
※dayi4-ibus1.cin做出的db檔會缺字…
※dayi3_ibus.txt做出的db檔含蓋四碼的內容,其實還蠻好用的。

其它ibus輸入法

1
2
3
4
5
6
7
8
9
10
11
12
sudo apt-get install ibus-table-cangjie3 #第三代倉頡輸入法
sudo apt-get install ibus-table-cangjie-big #倉頡輸入法,不過第三代和第五代一起裝
sudo apt-get install ibus-table-wubi #五筆輸入法
sudo apt-get install ibus-table-cantonese #廣東話輸入法
sudo apt-get install ibus-table-emoji #表情符號輸入法
sudo apt-get install ibus-table-quick #速成輸入法
sudo apt-get install ibus-table-stroke5 #筆劃輸入法
sudo apt-get install ibus-zhuyin #注音輸入法
sudo apt-get install ibus-pinyin #拼音輸入法
sudo apt-get install ibus-chewing #新酷音輸入法
ibus restart
#ibus-setup

https://www.ubuntu-tw.org/modules/newbb/viewtopic.php?post_id=319858
https://www.ubuntu-tw.org/modules/newbb/viewtopic.php?topic_id=58116
https://hochin.wordpress.com/2014/07/23/%E5%9C%A8ibus%E4%B8%AD%E5%8A%A0%E5%85%A5%E5%A4%A7%E6%98%93%E8%BC%B8%E5%85%A5%E6%B3%95/


  1. 取得大易輸入法對照檔,編碼格式需為UTF-8。以下是我的dayi3.cin的內容:

%geninp
%ename dayi
%cname 大易
%selkey ‘[]-\”{}
|
%keyname begin
= =
` 巷
, 力
. 點
/ 竹
0 金
1 言
2 牛
3 目
4 四
5 王
6 門
7 田
8 米
9 足
; 虫
A 人
B 馬
C 七
D 日
E 一
F 土
G 手
H 鳥
I 木
J 月
K 立
L 女
M 雨
N 魚
O 口
P 耳
Q 石
R 工
S 革
T 糸
U 艸
V 禾
W 山
X 水
Y 火
Z 心
%keyname end
%chardef begin

` 巷
, 力
, ,
. 方
. 舟
. 。
/ 竹
0 金
1 言
2 牛
3 目
4 四
5 王
6 車
7 田
8 八
9 止
; 虫

(略)

%chardef end

2.利用底下的指令取得字根表,並且將字根表的空白改為tab,並且加上權重,然後將所有的大寫字母改為小寫字母
awk ‘/\%chardef begin/{f=1;next}/\%chardef end/{exit}f’ dayi3.cin | awk ‘{count[$1]++}{print $1”\t”$2”\t”101-count[$1]}’ | tr ‘[A-Z]’ ‘[a-z]’ > dayi3.txt

得到如下內容如下:

` 巷 100
, 力 100
, , 99
. 方 100
. 舟 99
. 。 98
/ 竹 100

(略)

3.將/usr/share/ibus-table/table/ 空白範例表,拷貝到家目錄
cp /usr/share/ibus-table/tables/template.txt ~/.

4.準備修改template.txt表頭資料,加上大易的相關資料,有修改的地方如下

利用 uuidgen 指令產生一組UUID後貼到這裡.

UUID = 730a0da0-20e9-45d9-befa-cbe59375be2d

可直接使用日期簡單省事

SERIAL_NUMBER = 20121010

出現的圖示,這裡直接使用內建的圖型,可自己另行設計

ICON = cb-mode.svg

The local names of this table, this is optional

NAME.zh_CN = 大易
NAME.zh_HK = 大易
NAME.zh_TW = 大易

the gettext tools in runtime as 中.

STATUS_PROMPT = 易

Valid input chars.

VALID_INPUT_CHARS = ,./;`=1234567890abcdefghijklmnopqrstuvwxyz

BEGIN_TABLE

END_TABlE

把最後三行加上三個#號,表示註解,也就是不要用它啦

BEGIN_GOUCI

character_1 goucima_1

character_1 goucima_2

END_GOUCI

  1. 將第2項做出來的檔案資料dayi3.txt的所有內容,複製貼上拷貝到template.txt中的BEGIN_TABLE和END_TABLE之間。 做好之後假設存檔命名為dayi3_ibus.txt。
    6.利用下列指令做出dayi3.db表格檔
    ibus-table-createdb -s dayi3_ibus.txt -n dayi3.db
    7.做出來的dayi3.db拷貝到/usr/share/ibus-table/tables底下
    sudo cp dayi3.db /usr/share/ibus-table/tables/dayi3.db
    8.從ibus偏好設定中,增加大易輸入法即可

Step 1. 視需求下載大易字根檔 (四碼或三碼)
$ wget http://opensource.nchc.org.tw/odp/others/OXIM/cin_tables/dayi4.cin.gz
$ wget https://raw.github.com/lukhnos/openvanilla/master/Source/Mac/MacDataTables/dayi3.cin
Step 2. 本篇以大易四碼為例, 解包後產生 Tab 間隔的字碼表
$ gunzip dayi4.cin.gz
$ awk ‘/\%chardef begin/{f=1;next}/\%chardef end/{exit}f’ dayi4.cin | awk ‘{count[$1]++}{print $1”\t”$2”\t”101-count[$1]}’ | tr ‘[A-Z]’ ‘[a-z]’ > dayi4.txt
Step 3. 編輯樣板檔案
$ cp /usr/share/ibus-table/tables/template.txt ./ (此檔案包含在 ibus-table 套件中)
$ uuidgen
01124167-1c32-472d-ad5f-29c9c7458420
$ vi template.txt
UUID = 01124167-1c32-472d-ad5f-29c9c7458420
SERIAL_NUMBER = 20131230
ICON = dayi3.png
NAME.zh_CN = 大易
NAME.zh_HK = 大易
NAME.zh_TW = 大易
STATUS_PROMPT = 易
VALID_INPUT_CHARS = ,./;`=1234567890abcdefghijklmnopqrstuvwxyz

BEGIN_GOUCI

character_1 goucima_1

character_1 goucima_2

END_GOUCI

Step 4. 將 dayi4.txt 內容插入 template.txt 的 BEGIN_TABLE 與 END_TABLE 之間
Step 5. 產生輸入法資料庫檔案
$ sudo vi /usr/share/ibus-table/engine/tabcreatedb.py
約 210 列的地方
try:
attr,val = unicode (l,”utf-8”).strip().split (‘=’, 1)
except:
attr,val = unicode (l,”utf-8”).strip().split (‘==’, 1)
$ ibus-table-createdb -s template.txt -n dayi4.db
$ sudo cp dayi4.db /usr/share/ibus-table/tables/
Step 6. 取得大易輸入法圖示
$ wget https://raw.github.com/hime-ime/hime/master/icons/blue/dayi3.png
$ sudo cp dayi3.png /usr/share/ibus-table/icons/
Step 7. 於 iBus 設定介面新增大易輸入法
$ ibus-daemon -x -r -d (重新啟動 iBus Daemon)
$ ibus-setup

compress and tar commands

.tar (僅打包,無壓縮)

套件名稱:tar。
打包:
[ jonny@linux ~ ]
$ tar cvf FileName.tar DirName
解包:
[ jonny@linux ~ ]
$ tar xvf FileName.tar

.gz

套件名稱:gzip。
壓縮
[ jonny@linux ~ ]
$ gzip FileName
解壓縮 1:
[ jonny@linux ~ ]
$ gunzip FileName.gz
解壓縮 2:
[ jonny@linux ~ ]
$ gzip -d FileName.gz

.tar.gz

套件名稱:gzip。
壓縮:
[ jonny@linux ~ ]
$ tar zcvf FileName.tar.gz DirName
解壓縮:
[ jonny@linux ~ ]
$ tar zxvf FileName.tar.gz

bz
壓縮:unkown。
解壓縮 1:
[ jonny@linux ~ ]
$ bzip2 -d FileName.bz
解壓縮 2:
[ jonny@linux ~ ]
$ bunzip2 FileName.bz

.tar.bz

壓縮:unkown。
解壓縮:
[ jonny@linux ~ ]
$ tar jxvf FileName.tar.bz

.bz2

套件名稱:bzip2。
壓縮:
[ jonny@linux ~ ]
$ bzip2 -z FileName
解壓縮 1:
[ jonny@linux ~ ]
$ bzip2 -d FileName.bz2
解壓縮 2:
[ jonny@linux ~ ]
$ bunzip2 FileName.bz2

.tar.bz2

套件名稱:bzip2。
壓縮:
[ jonny@linux ~ ]
$ tar jcvf FileName.tar.bz2 DirName
解壓縮:
[ jonny@linux ~ ]
$ tar jxvf FileName.tar.bz2

.xz

套件名稱:xz-utils。
壓縮:
[ jonny@linux ~ ]
$ xz -z FileName
解壓縮:
[ jonny@linux ~ ]
$ xz -d FileName.xz

.tar.xz

套件名稱:xz-utils。
壓縮:
[ jonny@linux ~ ]
$ tar Jcvf FileName.tar.xz DirName
解壓縮:
[ jonny@linux ~ ]
$ tar Jxvf FileName.tar.xz

.Z

壓縮:compress FileName
解壓縮:
[ jonny@linux ~ ]
$ uncompress FileName.Z

.tar.Z

壓縮:
[ jonny@linux ~ ]
$ tar Zcvf FileName.tar.Z DirName
解壓縮:
[ jonny@linux ~ ]
$ tar Zxvf FileName.tar.Z

.tgz

套件名稱:gzip。
壓縮:
[ jonny@linux ~ ]
$ tar zcvf FileName.tgz FileName
解壓縮:
[ jonny@linux ~ ]
$ tar zxvf FileName.tgz

.tar.tgz

套件名稱:gzip。
壓縮:
[ jonny@linux ~ ]
$ tar zcvf FileName.tar.tgz FileName
解壓縮:
[ jonny@linux ~ ]
$ tar zxvf FileName.tar.tgz

.7z

套件名稱:p7zip-full。
壓縮:
[ jonny@linux ~ ]
$ 7z a FileName.7z FileName
使用密碼 (PASSWORD) 壓縮:
[ jonny@linux ~ ]
$ 7z a FileName.7z FileName -pPASSWORD
解壓縮:
[ jonny@linux ~ ]
$ 7z x FileName.7z

.zip

套件名稱:zip。
壓縮:
[ jonny@linux ~ ]
$ zip FileName.zip DirName
解壓縮:
[ jonny@linux ~ ]
$ unzip FileName.zip

.rar

套件名稱:rar, unrar。
壓縮:
[ jonny@linux ~ ]
$ rar a FileName.rar DirName
解壓縮 1:
[ jonny@linux ~ ]
$ rar e FileName.rar
解壓縮 2:
[ jonny@linux ~ ]
$ unrar e FileName.rar
解壓縮 3:在指定目錄內解壓縮。
[ jonny@linux ~ ]
$ rar x FileName.rar DirName

.lha

套件名稱:lha。
壓縮:
[ jonny@linux ~ ]
$ lha -a FileName.lha FileName
解壓縮:
[ jonny@linux ~ ]
$ lha -e FileName.lha
install eclipse on ubuntu

install

1
2
3
4
#download eclipse-jee-oxygen-R-linux-gtk-x86_64.tar.gz from www.eclipse.org
tar zxvf eclipse-jee-oxygen-R-linux-gtk-x86_64.tar.gz
mv eclipse /opt
/opt/eclipse/eclipse

create desktop configuration

1
2
3
4
5
6
7
8
9
10
11
vi /usr/share/applications/eclipse.desktop

Name=Eclipse 4
Type=Application
Exec=/opt/eclipse/eclipse
Terminal=false
Icon=/opt/eclipse/icon.xpm
Comment=Integrated Development Environment
NoDisplay=false
Categories=Development;IDE;
Name[en]=Eclipse

spring-boot

1
2
3
4
5
6
7
8
9
10
11
12
13
14
15
16
17
18
19
20
21
22
23
24
25
26
mkdir spring-boot
cd spring-boot

# http://repo.spring.io/release/org/springframework/boot/spring-boot-cli/
wget http://repo.spring.io/release/org/springframework/boot/spring-boot-cli/1.5.2.RELEASE/spring-boot-cli-1.5.2.RELEASE-bin.zip
unzip spring-boot-cli-1.5.2.RELEASE-bin.zip

set path=%path%;C:\Users\leon\spring-boot\spring-1.5.2.RELEASE\bin
spring --version

set JAVA_TOOL_OPTIONS=-Dfile.encoding=UTF-8 -Dinput.encoding=UTF-8 -Duser.language=en -Xverify:none -Duser.timezone=Asia/Taipei -XX:+UseStringDeduplication
set SERVER_PORT=8099
spring init --dependencies web,jpa,jdbc rest-cli
cd rest-cli
mvn clean compile
mvn package
mvn test
~~mvn deploy~~
mvn spring-boot:run -Dserver.port=8099
run
repackage
start
stop
build-info
java -jar target\rest-cli-0.0.1-SNAPSHOT.jar
mvn exec:java -Dexec.mainClass=com.example.DemoApplication
<dependency>
    <groupId>org.springframework.boot</groupId>
    <artifactId>spring-boot-starter</artifactId>
</dependency>
<dependency>
    <groupId>org.springframework.boot</groupId>
    <artifactId>spring-boot-starter-data-jpa</artifactId>
</dependency>
<dependency>
    <groupId>org.springframework.boot</groupId>
    <artifactId>spring-boot-starter-jdbc</artifactId>
</dependency>

<dependency>
    <groupId>org.springframework.boot</groupId>
    <artifactId>spring-boot-starter-web</artifactId>
</dependency>
<dependency>
    <groupId>org.springframework.boot</groupId>
    <artifactId>spring-boot-starter-test</artifactId>
    <scope>test</scope>
</dependency>

<dependency>
  <groupId>mysql</groupId>
  <artifactId>mysql-connector-java</artifactId>
  <version>5.1.38</version>
</dependency>    

<dependency>
  <groupId>org.hsqldb</groupId>
  <artifactId>hsqldb</artifactId>
</dependency>    

<dependency>
    <groupId>com.h2database</groupId>
    <artifactId>h2</artifactId>
    <version>${h2.version}</version>
</dependency>
1
2
3
4
5
6
7
8
9
10
11
12
13
14
15
16
17
18
19
package com.example;

import org.springframework.boot.SpringApplication;
import org.springframework.boot.autoconfigure.SpringBootApplication;
import org.springframework.web.bind.annotation.*;

@SpringBootApplication
@RestController
public class DemoApplication {

public static void main(String[] args) {
SpringApplication.run(DemoApplication.class, args);
}

@RequestMapping("/greet")
public String hello(){
return "Hello REST!!!";
}
}

application.properties:

# @see https://docs.spring.io/spring-boot/docs/current/reference/html/boot-features-sql.html
server.port = 8099
java.version=1.7

#mysql
spring.datasource.url=jdbc:mysql://localhost/test
spring.datasource.username=dbuser
spring.datasource.password=dbpass
spring.datasource.driver-class-name=com.mysql.jdbc.Driver

#h2
#spring.datasource.url = jdbc:h2:mem:app_db;DB_CLOSE_ON_EXIT=FALSE
#spring.datasource.url = jdbc:h2:file:~/h2/app_db;DB_CLOSE_ON_EXIT=FALSE
spring.datasource.username = sa
spring.datasource.password =
spring.datasource.driverClassName = org.h2.Driver
spring.datasource.url=jdbc:h2:mem:testdb;Mode=Oracle
spring.datasource.platform=h2
spring.datasource.continue-on-error=true

spring.jpa.hibernate.ddl-auto=update

spring.jpa.hibernate.ddl-auto=none
spring.profiles.active=h2

example

http://mycuteblog.com/h2-database-example-hibernate-spring-boot/